Exploring MPG unordered list columns
and hide show powers using only css

Namon Kent
Learn new MPG techniques
Uh, what’s MPG unordered list columns? It’s a new MPG feature! It gives you superpowers. No joke, there is stuff that MPG unordered list columns can do that unlocks things in WordPress we’ve never been able to do before.
While everything about MPG unordered list is exciting, perhaps the most interesting thing is that it provides a way to specify a large list in a small amount of real estate. An MPG unordered list provides more compact information to the user, and that results in something cool: We can give the users the information they need in a small amount of space!
But before we get too giddy about this, it’s worth noting that support isn’t quite there. As it current stands at the time of this writing, @property is supported in Chrome and, by extension, Edge. We need to keep an eye on browser support for when we get to use this in other places, like Firefox and Safari.
First off, we look at MPG

That’s right! Custom lists right out of the box. It’s sorta like having your own database analyst. And that’s just the tip of the iceberg. Check out all of the various list we have at our disposal:
- World cities
- US cities
- Plumbing Services
- Locksmith Services
- Parts List
- Directory of Partners
- App Integrations
- Austrian Business
- Austrian Streets
- Austrian Regions
- Austrian Places
- Switzerland Business
- Switzerland Streets
- Switzerland Regions
- Switzerland Places
- etc…
Before any of this, we may have relied on using VAs to chug all this data to gold (create pages). With the power of MPG, What cool stuff can we do? Let’s take a look at using MPG for an unordered list.
Let’s build an HTML list
See the Pen MPG UL List by Kent (@maryjokent) on CodePen.
Hiding and showing an MPG unordered list is really simple. In the HTML, I will show you how to setup a class that uses CSS to do the heavy lifting. I will also show you another version of hiding and showing MPG unordered list using jQuery in another article. Furthermore, we will take the necessary precautions if Javascript is disabled. Let’s dive in!
Hide and show a div with CSS no Javascript
The first method, involves using only CSS. We will use the CSS pseudo-class :focus. The idea is that we want to show the div once the user has clicked on the link, and display the list of cities. This effect is commonly used when you have a large list of items. It saves space, without compromising the necessary information for the user.
See the Pen MPG UL List CSS Only by Kent (@maryjokent) on CodePen.
By looking at the end result, we can begin to piece together the individual parts of the whole. What we see above is the finished product that hides and shows a div using pure CSS with no javascript code. The nice part about this solution is the simple code structure and minimal lines of code. Now let’s drive into the HTML code structure.
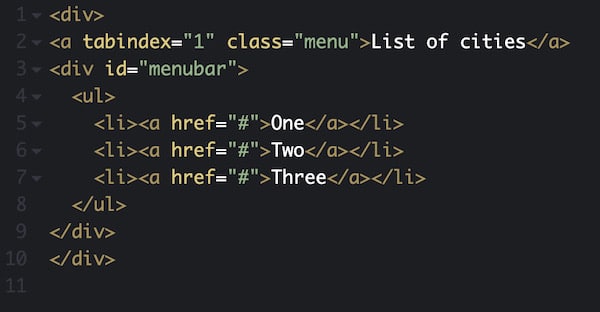
HTML Code
First we need to add the HTML. We create a div with an anchor element inside. What makes this anchor element special is the tabindex parameter. Without the tabindex the hide and show action will not work. We assign the class “menu” to the anchor element. Inside the div we add another div and an unordered list, which is hidden at first. Once the user mouse clicks on the anchor element, the inside div is displayed and the unordered list is displayed. The unordered list is use to demostrate our use case. You can replace the unordered list with whatever you want. If you want the unordered list to show a list of cities, this is can be done by using MPG short code.
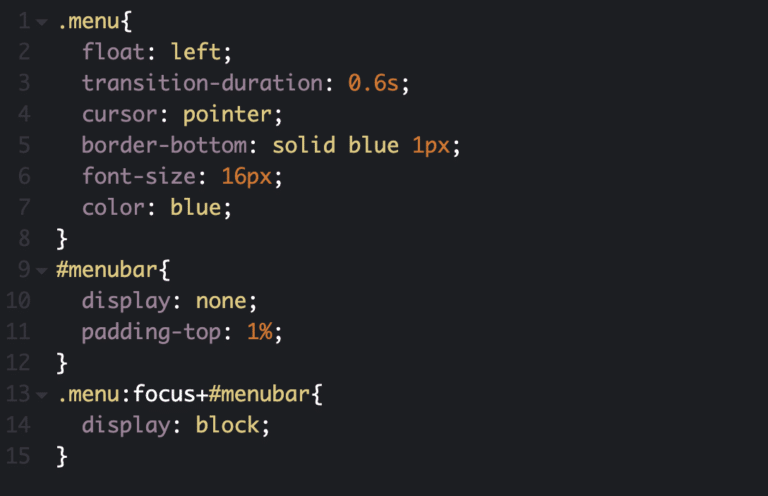
CSS Code
Next we have to add some CSS. By default, the elements that will be hidden are: a) the unordered list and b) the inside div. To affect something with CSS you add “ + ” at the end of the class, meaning you target the descendants of that class. For example: .this_class>affects_this. The one id you are changing must be a child of the parent class (in the previous example affects_this is the child of .this_class). The third CSS statement, tells the browser to show the unordered list once the anchor element is clicked.
That’s all you need for creating the hide and show action. Now, it’s up to you to create your MPG shortcode; style it and make it look sexy with some cool CSS3 coding.
What is an MPG Shortcode
MPG has two types of shortcode applications. The best way to describe the first type is as a template shortcode. Which the MPG developer calls simple shortcode. Simple MPG shortcode works only with the specified Template page of your MPG Project. The second type is a list shortcode. Which generates a list of MPG URLs that can be used on any page of your website. A list shortcode is a very powerful feature of MPG that we will explore now.
WordPress shortcodes were introduced in version 2.5 and since then have_proved to be one of the most useful features. The average user acting as editor has the ability to_publish dynamic content using macros, without the need for programming skills.
When a shortcode is inserted in a WordPress post or page, it is replaced with some other content. In other words, we instruct WordPress to find the macro that is in square brackets ([]) and replace it with the appropriate dynamic content, which is produced by a PHP function.
MPG list shortcode is made up of three components:
- Project Id parameter
- Filter parameter
- Limit parameter
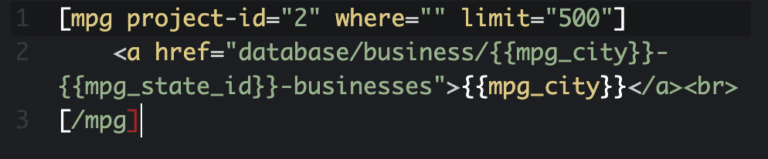
The usage is pretty simple. Let’s say we want to show the first 500 items in a list. We could use something like this:
[mpg project-id="2" where="" limit="500"]
For a more advanced shortcode, we could set the filter by setting a parameter ‘where’ for MPG shortcode {{mpg-state}}:
[mpg project-id="2" where="{{mpg-state}}=wa" limit="500"]
Going one step further, we could set multiple filter parameters for the list:
[mpg project-id="2" where="{{mpg-state}}=wa & {{mpg-county}}=duqeune" limit="500"]
Now let’s look at the middle of the MPG list shortcode. We will use an HTML element (or anchor element) with mpg simple shortcodes. The HTML element (or anchor element), with its href attribute, creates a hyperlink to web pages, files, email addresses, locations in the same page, or anything else a URL can address. Content within each should indicate the link’s destination. If the href attribute is present, pressing the enter key while focused on the element will activate it. Since we are using MPG are anchor element href will be the URL Format Template of an MPG project.
<a href="database/business/{{mpg_city}}-{{mpg_state_id}}-businesses">{{mpg_city}}</a><br>
MPG list shortcode termination is as follows:
[/mpg]
Adding The MPG List Shortcode To The HTML Markup
Let’s build out our code with the MPG list shortcode. This is how our code will look like now:
See the Pen MPG UL List CSS Only by Kent (@maryjokent) on CodePen.
Once the code is added to a WordPress Post or Page, then the MPG list shortcode will be converted to a list of URLs. Now let’s update the HTML and the CSS to create three columns for our list.
See the Pen MPG UL List CSS Only by Kent (@maryjokent) on CodePen.
We add the following CSS class ‘generated_list to the second HTML div. Then we add the CSS code for generated_list class as shown below:
					.generated_list {
  -webkit-column-count: 3;
  column-count: 3;
}
Conclusion
See how simple it is to hide and show a div and add MPG list? As a farewell gift from me to you, I will share with you how to do the same thing with Javascript code in another article.


